Design Your Own Phone Case

I bought my phone case at a mall kiosk and it immediately started peeling. Eventually I got so sick of the peeling paint job that I used nail polish remover and cotton balls to remove the rest of it. My phone case has been boring ever since. Today, I decided to use some of my left-over acrylic paint to do something fun.

Materials:

Old phone case

Two colors of acrylic paint

Mod-Podge Glue

Larger paint brush & Fine paint brush

Nail Polish Remover and Cotton Balls

Step 1: Strip paint off with nail polish remover and cotton balls and wipe down phone case with a wet paper towel.one

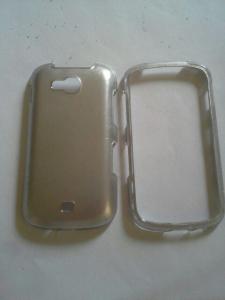
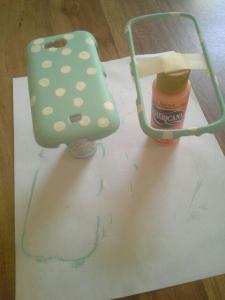
Step 2: Use the thicker paint brush to apply a base coat. Reapply until you have a thick cover.two

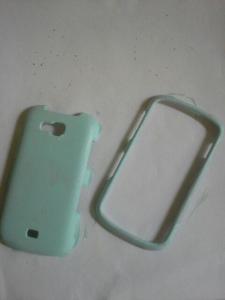
Step 3: When the paint is dry, draw circles where you want the dots to be.

Step 4: Use fine paint brush to apply the dots. Reapply until you have a thick cover.

three

Step 5: When the paint is dry, seal it with a thin coat of Mod-Podge glue.
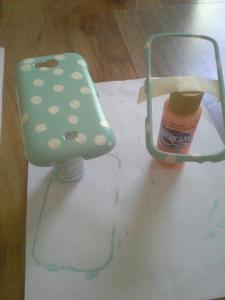
four

Finished!

five

Personalized Drink Glasses

As a college student I have a lot of movie nights with my friends that almost always include drinks. We have had wine nights, margarita nights, and every time we find a new drink we love, we want to share it with each other. We also don’t have a lot of money to spend on matching glasses, so we found a different way to create a glass collection.

Materials:

Wine, Margarita, & Martini glasses ($1 each, Dollar Tree)

Glitter ($3, Hobby Lobby)

Mod-Podge Glue ($5, Hobby Lobby)

Sponge Brushes ($5, Hobby Lobby)

Masking Tape

Step 1: Wash glasses to make sure they are clean. 20150421_174444

Step 2: Place masking tap around the base where you want the glitter to stop.

Step 3: Use the brush to paint the base with Mod-Podge (do not paint the bottom).

20150421_175255

Step 4: Sprinkle the base with a thin coat of glitter and place the glasses upside down while you let the glue dry.

Step 5: Repeat steps 3 and 4.

Step 6: Take off the tape before you seal the glitter with a final coat of Mod-Podge, place the glasses upside down to dry.

Finished!

20150422_123725

NOTE: Mod-Podge is water-soluble. The glasses are washable, but they should never be left in water to soak.

Simple Canvas Painting

I was looking for a new project when my friend mentioned she is updating her room. Since she has a birthday coming up I figured I would make her something to go on her walls. She loves Frozen so I took her color scheme and created a canvas painting around the phrase “let it go”.
20150421_192942

Materials:

10×10 Canvas ($7, Hobby Lobby)

3 Colors of All-purpose Craft Paint ($1 each, Hobby Lobby)

Paint Brushes ($5, Hobby Lobby)

Quarters

Pencil

20150421_194730

Step 1: Paint the canvas a base color (remember to paint the sides), and let it dry completely overnight.

20150422_140246

Step 2: Place Quarters where you want the polka dots to be and trace their outline in pencil. Then sketch on the phrase you want to paint. (Optional: choose what color the polka dots are going to be so you don’t accidentally paint too many a certain color.)20150422_143858

Step 3: Paint half of the polka dots one color. Once they are dry; paint the remaining polka dots the other color.

Step 4: Carefully paint over the letters. (When painting be careful to paint over all of the pencil marks.)

Step 5: Re-paint over the polka dots and letters 2-3 times and let dry.

Finished!

20150422_154356-1

New Year, Old Wine Bottles

I am in love with wine. My perfect night involves watching Netflix with a glass of Barefoot Red Moscato or having a wine night with my friends. I’ve seen a lot of wine bottle crafts so I decided to try making a cute New Years decoration for my apartment.

Materials:

Mod Podge Glue ($3, Hobby Lobby)

Glitter ($3)

Foam Brush ($2)

Post-its ($1)

4 Empty Wine Bottles (with caps/corks)

Step 1: Get four bottles of your favorite wine and enjoy it. When they’re empty, wash them and remove all of the labels and stickers (warm water and dish soap do the trick, so nothing special is needed). Let the bottles dry and put the caps back on/corks back in.

Step 2: Go to Microsoft Word and choose a font for your numbers (2015), make them as large as you want, and remember to leave plenty of space between them on the page before printing it off.

Step 3: Using only the sticky parts of post-it notes, cover the numbers (making sure to overlap the post-its) and trace the numbers onto the post-its. (Example below.)

Numbers

Step 4: Remove the post-its and carefully cut the numbers out and stick one number to each of the wine bottles. The overlap makes it a lot easier to re-align the post-its on the bottles. (Try to put the numbers at the same height on each bottle.)

Step 5: Using a foam brush paint a thin layer of mod podge glue onto your bottle. Remember you will need to peel the post-its off, so don’t paint over them. Use the post-its as a guide line for where you put the glue.

Step 6: Sprinkle a light layer of glitter over your entire bottle and wait for the glue to dry.

Step 7: Use a pair of tweezers to carefully pull off the post-its. You can leave them on if you want, but at this point you don’t need them.

Step 8: If you want a thicker layer of glitter, here’s your chance! Repeat step 6, remembering to not put any glue over the numbers. If you like how the glitter looks, seal it with a light layer of glue and let it dry.

Finished!

Header

It’s already April and I still haven’t put this decoration away. It’s a really simple way to reuse old wine bottles and a great way to brighten up any home!

Old Jeans to New Shorts

It’s that time of year. Spring has finally arrived and it’s time to clean out your house and closets and return all your winter-wear to storage. I’ve been slowly going through my closet and am finding that some of the jeans I used to love are too out of style. I’m not a fan of throwing clothes away so it’s time for an update.

I’ve decided to try something I’ve seen a couple of times on Pinterest and other blogs and to turn my out of style jeans into some cute shorts I’ll love to wear in the coming warmer months.

Materials:

Old pair of jeans

Scissors

All purpose craft paint ($1, Hobby Lobby)

Stencils ($1, Hobby Lobby)

Sponge brushes ($1, Hobby Lobby)

Q-Tips

Masking Tape

Sewing machine (optional)

Step 1: Take your scissors and cut off the legs of the jeans. Cut them longer than you will want them to be; leave a little wiggle room.

CutJeans

Step 2: Position the stencils somewhere you like on the jeans, I chose stars because I’ve always wanted a pair of 4th of July shorts.

Stencils

Step 3: Dip a sponge brush in a little paint, try not to get too much on the brush because it will end up smudging around the stencils.

Step 4: Remove the stencils and use the Q-Tips to do touch ups on your stars.

Step 5: Use masking tape to sharpen the edges of your stars. Use small strips of masking tape around the outline of the stars to make every edge of the star sharp. (It looks messy, but it does a really great job.)

MaskingTape

Step 6: Decide how long you want your shorts to be and trim the extra leg fabric so you can double cuff the ends.

Step 7: Iron the cuffs and enjoy! (You can also use a sewing machine to stitch along the side hem lines to keep the cuffs in place.)

Finished!

Finished

Try making yourself a pair and comment below with how your project turned out!

Inspirational Mirror

I am a huge fan of hand lettering and turning an inspirational phrase into something pretty that can be displayed around my apartment.

I took a phrase I loved and turned it into a really awesome wall decoration with a mirror, some stickers, and black spray paint.

Materials:

An Inspirational Phrase

Empty Cereal Box

Mirror ($20 Jo-Ann Fabrics)

Black Spray Paint ($10 Walmart)

Letter Stickers ($5 Jo-Ann Fabrics)

Command Strips ($4 Walmart)

Step 1: Clean the mirror. If it has anything dirty or smudgy on it the stickers and spray paint won’t stick the way you want them to.

Step 2: Cut out the letter stickers (DON’T PEEL THEM) and arrange them into your phrase. This is just to double check that you have the correct amount of letters.

Step 3: Arrange your phrase on the mirror into a position that you are happy with. (I decided I had a little too much blank space and added a heart to the upper right corner.)

Step 4: Peel the letters off and stick them to your mirror and clean the glass around them one more time to get rid of any excess smudging. (It will look like the picture below.)

Mirror1

Step 5: Go outside! You need an open area when spray painting so I spray painted outdoors on my lawn. I used an old cereal box to keep the grass from getting stuck to the paint. (You can choose a spray paint with any kind of finish, I chose one with a matte finish to emphasize the reflection of the letters.)

Step 6: Prep your spray paint and make sure to cover the entire mirror (sides included) with an even layer of paint.

Step 7: Put the mirror somewhere it won’t be disturbed and let it dry for at least 24 hours before carefully peeling off the stickers.

Step 8: Attach command strips to the back of the mirror so you can hang it somewhere you can enjoy it!

Finished!

Mirror2

Turn Candle Jars into Stylish Bathroom Storage

Candles are great for decoration and make your apartment smell amazing, but what do you do with them after they’ve burned out?

Here is an idea: re-purpose those old candles by turning the jars into simple bathroom storage that will keep your home organized and stylish!

Materials:

Candle with a lid ($22.50 at Bath and Body Works)

Paper towel

Warm Water

Dish Soap

Step 1: Buy a candle with a lid and enjoy using it. You can use any candle you want. I used a  candle from Bath and Body Works because the jars are simple and the wax burns evenly, making it easier to clean out.

Candle

Step 2: When there is only about 1 cm of wax left in the jar, burn the candle until all of the wax has completely liquefied.

Step 3: When the wax is liquefied, blow out the candles and dump out as much of the wax as you can. You can dump it into an old soup can, but the wax cools fairly quickly so putting it straight into the garbage isn’t a problem. Wipe out any wax still in the jar with paper towel.

Step 4: Remove the wicks from the bottom of the jar. The glue should still be warm and easy to manipulate, but if you’re having issues scraping it off, place the jar into a bowl of warm water for 1-2 minutes and the glue should be easier to remove.

Step 5: Make sure the inside of the jar is free of residue from the wax and glue by washing it with a little bit of dish soap and warm water.Empty Jar

Step 6: Peel off the candle’s label and the bottom sticker and remove any remaining residue in the soapy warm water. Let dry.

Step 7: Fill the jar with whatever you want and enjoy your new storage!

Ideas for Fillers:

My candle jars are a super cute way to hold Q-tips, cotton balls, and make-up sponges.Finished Jars

Jar Decoration Options:

If you want to do something even more creative with your empty candle jar there are options all over Pinterest. You can find tutorials on there for turning them into glazed holders for tea-lights, ideas for painting designs on them, and you can see some examples of glass knobs that can be hot glued to the lid as handles.

This is a simple and inexpensive way to create new storage for your bathroom and is a great way to re-purpose something you no longer have any use for.

One-of-a-Kind Travel Mug

If you’re a college student like me, you’re probably addicted to coffee. I always have a cup of coffee in my hand when I go to class and have several different travel mugs, but this one-of-a-kind mug is my favorite.

A couple of years ago someone in my family got me a Create-Your-Own travel mug from Starbucks and I decided to turn it into something no one else had by making the design-able insert sparkle.

I used Mod Podge and black glitter to turn the basic travel mug into something that makes everyone ask, “Where did you get that?!”.

Materials:

Mod Podge Glue ($3, Hobby Lobby)

Sponge (Pack $2, Hobby Lobby)

Glitter ($3, Hobby Lobby)

Create-Your-Own Travel Mug ($19, Starbucks)

Supplies

Step 1: Take out the design-able insert.

Step 2: Make sure the insert won’t stick to anything by standing it up on a plate.

Step 3: Apply a layer of glue to one side of the insert with a sponge. I chose the outside.

Step 4: Sprinkle a thin layer of glitter on top of the glue. Remember to shake off the excess glitter onto the plate.
Insert

When the glue has dried it will turn clear, add one more layer of glue and glitter(optional).

Step 5: Seal the glitter with another coat of glue (optional). Let the glue dry overnight.

Step 6: Put the insert back inside the travel mug and enjoy your new accessory!

Finished!

Final

Care: Remember that Mod Podge glue is water-soluble, don’t get the insert wet!

My travel mug is one of my favorite crafts. It was inexpensive, easy, and I use it almost every day! I always get asked where I bought this mug and it’s so fun to be able to tell people how easy it is to make.

Make one for yourself and see!